OSG-Connect
Overview
OSG Connect will require SSH-key-based logins due to the changes in the backend authorization service. If you have not added an SSH key before, upload your public SSH key to your OSG Connect user profile (choose "Update Profile" after signing into the http://osgconnect.net/ website).
NOTE: Please do not edit the authorized keys file on the submit host (login.osgconnect.net).
You need to follow a two-step process to set up the SSH key to your account.
-
Generate SSH key pair.
-
Add your public key to the submit host.
After completing the process, you can log in from local machine (your laptop or desktop) to the OSG Connect submit host using ssh:
ssh <your_osg_connect_username>@login.osgconnect.net
or using your Windows SSH client
Step 1: Generating SSH Keys
We will discuss how to generate a SSH key pair on both Unix-based and Windows.
Please note: The key pair consist of a private key and a public key. Keep the private key on machines that you have direct access to, i.e. your local machine (your laptop or desktop).
Unix-based operating system (Linux/Mac)
On your local machine:
 mkdir ~/.ssh
 chmod 700 ~/.ssh
 ssh-keygen -t rsa
The last command will produce a prompt similar to
 Generating public/private rsa key pair.
 Enter file in which to save the key (/home/<local_user_name>/.ssh/id_rsa):
Unless you want to change the location of the key, continue by pressing enter. Now you will be asked for a passphrase. Enter a passphrase that you will be able to remember and which is secure:
 Enter passphrase (empty for no passphrase):
 Enter same passphrase again:
When everything has successfully completed, the output should resemble the following:
 Your identification has been saved in /home/<local_user_name>/.ssh/id_rsa.
 Your public key has been saved in /home/<local_user_name>/.ssh/id_rsa.pub.
 The key fingerprint is:
 ae:89:72:0b:85:da:5a:f4:7c:1f:c2:43:fd:c6:44:38 myname@mymac.local
 The key's randomart image is:
 +--[ RSA 2048]----+
 |                 |
 |         .       |
 |        E .      |
 |   .   . o       |
 |  o . . S .      |
 | + + o . +       |
 |. + o = o +      |
 | o...o * o       |
 |.  oo.o .        |
 +-----------------+
Windows
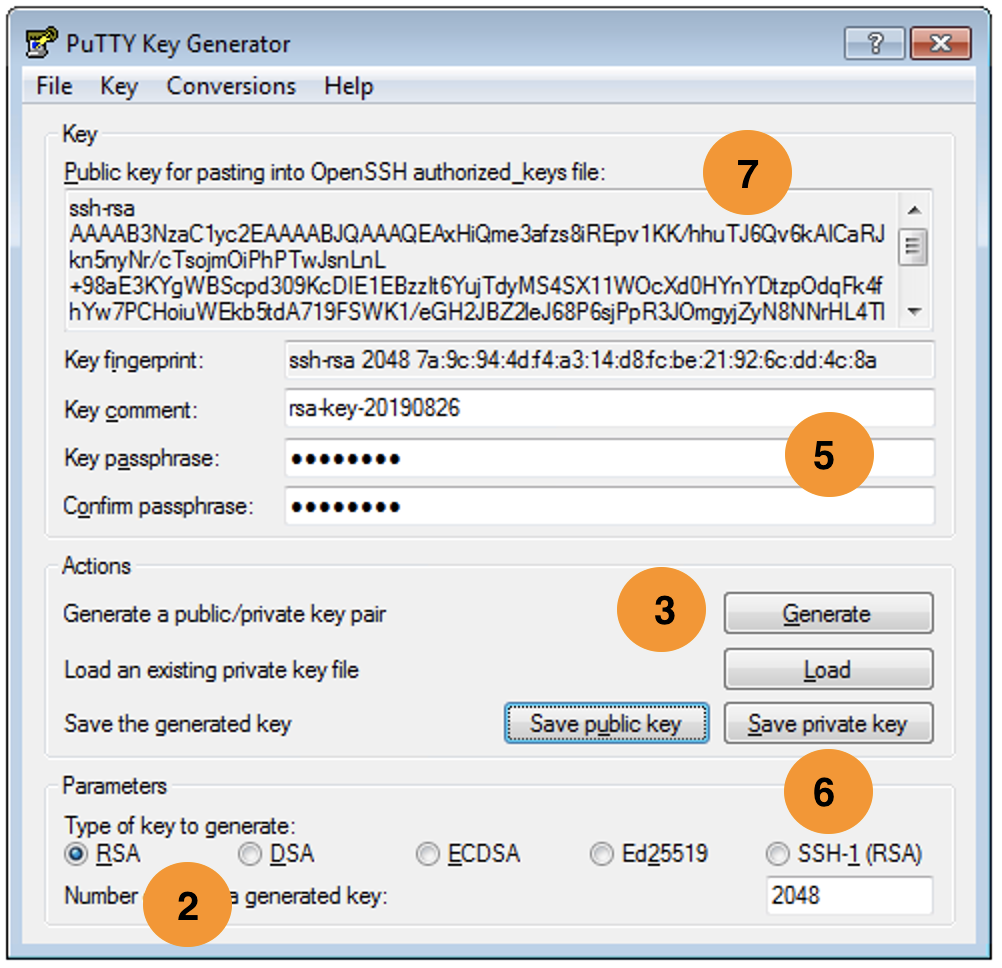
Putty
-
Open the
PuTTYgenprogram. -
For Type of key to generate, select SSH-2 RSA.
-
Click the Generate button.
-
Move your mouse in the area below the progress bar. When the progress bar is full, PuTTYgen generates your key pair.
-
Type a passphrase in the Key passphrase field. Type the same passphrase in the Confirm passphrase field. You can use a key without a passphrase, but this is not recommended.
-
Click the Save private key button to save the private key. Warning! You must save the private key. You will need it to connect to your machine.
-
Right-click in the text field labeled Public key for pasting into OpenSSH authorized_keys file and choose Select All.
-
Right-click again in the same text field and choose Copy.

Git Bash
Follow the instructions here to generate keys:
https://help.github.com/articles/generating-a-new-ssh-key-and-adding-it-to-the-ssh-agent/#platform-windows
Step 2: Add the public SSH key to login node
To add your public key:
-
Go to www.osgconnect.net and sign in
-
Go to "Update Profile"
-
Click on "Manage SSH and X.509 keys".
-
Click on "Add a New Key"
-
Give the key a name, select "SSH Public Key", and copy/paste the public key into the text box
-
Click "Add Key"
The key is now added to your profile in Globus Online. This will automatically be added to the login nodes within a couple hours.
Getting Help
For assistance or questions, please email the OSG User Support team at user-support@opensciencegrid.org or visit the help desk and community forums.